Saturday, December 31, 2011

Spacelegs Camp

Before we head off for our first space combat (Jabiim) as a lowly Space Cadet, a short intensive time in boot camp will help prepare you for ultimate space combat success. 

All the better to line your coffers with credits.

Space combat in swtor is much like an arcade game.  Your ship travels a predetermined path along a 'rail'.  You can, and will need to,  move your ship to dodge obstacles but you can't really change the path or the speed of the forward progression.   This isn't a free-for-all space dogfight.

Ship Controls

Left mouse click - fires one blaster
Left mouse hold - fires continuous blasters

Right mouse click - fire one missile
Right mouse hold,drag and release - paint up to 4 missile targets that launch on release

Spacebar - barrel roll

Print Screen - photo

Quickslots 1 - 4 - on use ship accessories
  1. Switch power to blasters
  2. Switch power to shields
  3. EMP
  4. ?
W-A-S-D (or whatever you remapped) - move ship

Mouse pointer- aim & target

Moving your ship and finding targets is straightforward.  You move your mouse and your ship follows.  Your mouse pointer will turn 'red' when moused over an enemy target.  With your mouse pointer over an enemy target left and/or right mouse click.  Your blasters and missiles will lock on and make their way to the enemy and go boom.

Sometimes you will want your mouse pointer aim going one direction and your ship dodging another direction.  This is when the keyboard movement keys are really handy.  Note that turn-left and turn-right key mappings are the most important for dodging.  Strafe left/right does nothing.

Hint!  Dodge big rocks.  They hurt if you run into them.

I'm playing Empire side.  Friendlies have red tails and enemies have yellow tails.  Distant inbound enemies are yellow specs.  As soon as you mouse over a distant yellow spec and get a red targeting symbol you can let loose your blasters.  You don't need to 'lead' the enemy, nor do you need to stay locked on until the blow.  It helps to have an idea of how many blaster shots are needed to take out an enemy.


Using Torpedos - hat tip Mazater
For those wondering how this item works: You'll have to find a shielded target (you'll know a shielded target from a blue "pulse" around it when you shoot at it with normal lasers; also your mouse icon will change when you mouseover a valid target), click right mouse button and keep it held down until the "locking" animation around your cursor finishes and then let go of your right mouse button. The locking process takes a few seconds, so be patient.


Ship HUD 

Around the edges of your screen are the display of important things you need to know during battle.


Your primary and bonus objectives are in the upper right.  Along with the time remaining to successfully complete the mission.

The mission will fail if you do not complete the primary objectives in the allotted time.  The mission will also fail if you die.

Bonus objectives are nice to complete for the added XP and credits.


The missile launch and bay.  This image indicates 12 missiles remaining with 2 available to launch from the bay.  The launch bay only holds 4 missiles at a time and slowly reloads as they are fired.

A target can not be painted for missile lock if the missile bay is empty.


Your ship HUD display is just like a companion panel.  So I guess during space combat your ship is your companion.

Should I name my ship?  I think I would like to call her Helva.

 The 'healthbar' shows the remaining armor value of the ship.  When the bar reaches all the way to empty, you and your ship die.  Your ship does not take 'durability' loss - isn't that nice!

This ship is taking damage, quite a bit but not complete.  This armor has degraded a small bit.

Ship shields at 100%.

Note!  Shields do not regenerate while you are firing blasters or missiles!


Shields and shield generators are ship items purchased from a Ship Upgrades vendor or your local friendly cybertech crafter.


Some of the ship items have an 'on use' ability and are found in the quickslots.  Used just like any other quickslot, but you want to key click them, not mouse click.

Just sayin'.


Space Battle

A few things to get use to looking for during space combat.


See those little bitty yellow specs in the upper right quadrant?  Just above the space rocks?  Those are inbound targets.  Taking out them out at distance is win.


Target marks!  And these are primary quest objectives.


Lots of enemy target markers.


A shield target.  Shielded targets need more ordinance to take out.

This is an enemy frigate.  A missile target is painted with a blue target circle.


May your space battles be epic.  Your credit gain stupendous.  Your XP boost to die for.

Up next in this Space Combat 101 series will be a Space Cadet story.  All about preparing for and maximizing your first space combat mission.

POD

A flying whale built for two.


Wednesday, December 28, 2011

The Gotwine Legacy is born


Join the Space Combat Forces

Level 31 Sonoma.  One days worth of Space Combat Dailies.  Net credit gain - $14,557.  Net XP gain - 38,547.  I forgot to track legacy gain.

It pays to join the daily forces.


Tuesday, December 27, 2011

Sunday, December 25, 2011

You've Got Mail!

The information bar top left of your UI indicates:  (1) where you are and how many are in your instance location, (2) how many online in your guild and (3) You've Got New Mail! 

Click the location and a WHO panel opens, click Guild for the Guild panel.  But you have to find a mailbox to get your new mail.


Minimap filters can help you quickly spot important places in your local area.  Get to minimap filters by clicking the diamond icon at about 1:00 in the upper right of the minimap frame.

Map Gutter Max Icon Count - Control how many icons can gutter in the minimap, showing closest first.

Find the setting at:  Game Menu, Preferences, User Interface, Map. 

Other Map settings include: Map Fades while Moving, Show Mapnotes for Untracked Missions, and settings for the visibility of group member mission map notes.

The minimap is handy for seeing things close by, but if you are having some trouble finding the local postal - call out the big guns.

Or, open your World Map.

Super Secret Agent Tip!  You can enable a magnifying glass in the World Map.  Game Menu, Preferences, User Interface Map.  Enable Magnifying Glass in World Map.


The Mailbox!  It is found!  A mailbox with a handy dandy bang means You've Got Mail!

Mostly standard MMO-Mail interface.  Your everyday send mail get mail.  And sometimes you might get bills (COD) in the mail.  Or, better yet, credits in the mail from the GTN - Global Trade Network.

A mail check box system can speed things up a bit.  Checked mail options are: 
  • Get all checked message attachments
  • Delete all checked messages
Clicking a mail item opens the View Mail Message Panel.  You can forward and backward through all your messages, take your credits, return to sender.


 As well as Ignore all messages from Sender
and Report as Spam. 

Saturday, December 24, 2011

A Gift for your Companion

Akavi Spaar:
Likes: Imp Memorabilia, Republic Memorabilia, Technology, Underworld Goods
Loves: Military Gear, Trophy, Weapons

Andronikus Revel:
Likes: Luxury, Trophy
Loves: Military Gear, Underworld Goods, Weapons

Aric Jorgan:
Likes: Republic Memorabilia, Technology, Trophy
Loves: Military Gear, Weapons

Ashara Zavros:
Likes: Luxury, Technology, Weapons
Loves: Artifacts, Military Gear, Republic Memorabilia

Blizz:
Likes: Artifacts, Luxury, Trophy
Loves: Technology, Underworld Goods, Weapons

Bowdaar:
Likes: Luxury, Military Gear, Technology, Underworld Goods
Loves: Artifiacts, Trophy, Weapons

Broonmark:
Likes: Artifacts, Imperial Memorabilia, Military Gear
Loves: Technology, Trophy, Weapons

Corso Riggs:
Likes: Artifacts, Luxury, Republic Memorabilia, Technology, Trophy
Loves: Military Gear, Weapons

Doc:
Likes: Artifacts, Military Gear, Technology, Trophy, Underworld Goods
Loves: Luxury

Doctor Lokin:
Likes: Imperial Memorabilia, Republic Memorabilia, Underworld Goods
Loves: Luxury, Military Gear, Technology

Elara Dorne:
Likes: Military Gear, Republic Memorabilia, Technology
Loves: Imperial Memorabilia, Luxury

Ensign Raina Temple:
Likes: Luxury, Republic Memorabilia, Weapons
Loves: Imperial Memorabilia, Military Gear

Gault Rennow:
Likes: Artifacts, Technology, Weapons
Loves: Luxury, Underworld Goods

Guss Tuno:
Likes: Artifacts, Imperial Memorabilia, Republic Memorabilia, Trophy
Loves: Luxury, Technology, Underworld Goods

Jaesa Willsam (Dark):
Likes: Imperial Memorabilia, Military Gear
Loves: Luxury, Trophy, Weapons

Jaesa Willsam (Light):
Likes: Military Gear, Trophy, Weapons
Loves: Artifacts, Republic Memorabilia

Kaliyo Djannis:
Likes: Military Gear, Technology
Loves: Luxury, Underworld Goods, Weapons

Khem Val:
Likes: Imperial Memorabilia, Technology, Trophy
Loves: Artifacts, Weapons

Kira Carsen:
Likes: Artifacts, Military Gear, Republic Memorabilia, Trophy, Underworld Goods
Loves: Courting, Luxury, Technology

Lt. Talos Drelik:
Likes: Technology
Loves: Artifacts, Imperial Memorabilia, Luxury, Republic Memorabilia

Lt. Iresso:
Likes: Luxury, Weapons
Loves: Republic Memorabilia, Trophy

Lt. Pierce:
Likes: Imperial Memorabilia, Technology, Trophy, Underworld Goods
Loves: Military Gear, Weapons

Lord Scourge:
Likes: Artifacts, Military Gear, Underworld Goods, Weapons
Loves: Imperial Memorabilia, Technology, Trophy

M1-4X:
Likes: Artifacts, Military Gear, Trophy, Weapons
Loves: Republic Memorabilia, Technology

Mako:
Likes: Artifacts, Luxury, Trophy, Weapons
Loves: Technology, Underworld Goods, Courting

Malavi Quinn:
Likes: Trophy, Underworld Goods
Loves: Imperial Memorabilia, Military Gear, Weapons

Nadia Grill:
Likes: Luxury, Underworld Goods
Loves: Courting, Artifacts, Republic Memorabilia

Qyzen Fess:
Likes: Military Gear, Technology, Underworld Goods
Loves: Weapons

Risha:
Likes: Imperial Memorabilia, Military Gear, Republic Memorabilia, Weapons
Loves: Artifacts, Luxury, Technology, Underworld Goods

Scorpio:
Likes: Artifacts, Military Gear, Trophy
Loves: Technology, Weapons

Sgt. Rusk:
Likes: Artifacts, Luxury, Technology, Trophy
Loves: Military Gear, Republic Memorabilia, Weapons

Sgt. Yuun:
Likes: Military Gear, Republic Memorabilia, Weapons
Loves: Artifacts, Technology, Trophy

Skadge:
Likes: Luxury, Military Gear, Trophy
Loves: Underworld Goods, Weapons

T7-01:
Likes: Military Gear, Weapons
Loves: Artifacts, Republic Memorabilia, Technology

Tanno Vik:
Likes: Military Gear, Technology
Loves: Underworld Goods, Weapons

Theran Cedrex:
Likes: Artifacts, Underworld Goods
Loves: Luxury, Technology

Torian Cadera:
Likes:
Loves: Military Gear, Trophy, Weapons

Vette:
Likes: Imperial Memorabilia, Republic Memorabilia, Technology, Weapons
Loves: Artifacts, Luxury, Underworld Goods

Victor Hyllis:
Likes: Luxury, Trophy, Weapons
Loves: Artifacts, Imperial Memorabilia

Xalek:
Likes: Trophy, Underworld Goods
Loves: Military Gear, Weapons

Zenith:
Likes: Military Gear, Underworld Goods
Loves: Weapons

Thank you ForceWelder - Source

Wednesday, December 21, 2011

Hey Boss!


So now you are a Crew Chief.  With your expanding crew it is time to partake in some Crew Management training.

Today we bring you, Companion Management 101.

Your first companion is gained towards the end of the class quest story line on your first planet.  S/He will be with you for a long time, so go on ahead and start learning this management gig.

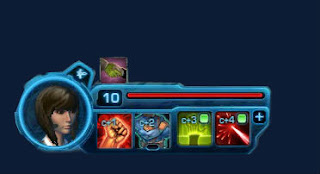
This is your companion frame, it is located in the lower left corner of your UI.

Chapter One.  Your crew have jobs, responsibilities, and skills.   Open your Crew Window by clicking right there on the companion avatar frame.  

You will pay them a lot of credits to do chores for you and they will sass you.

Kaliyo:  "I work better alone."


Chapter Two.  Crew have a lot more abilities and talents than is apparent to the casual observer.  Click that + [plus] sign at the end of the frame to open up the full abilities bar.


Chapter Three. Sometimes your companion's sassing and back-talking gets annoying.  Or she lays down on the job and won't get back to work.  Then you will need to dismiss her.  Right click *itch slap that avatar to bring up the Dismiss Companion Option.


Chapter Four.  If you find yourself out working and your companion has pulled a disappearing stunt, the companion frame will look like this.  Just click the paper doll head in the lower left corner to Summon Your Companion.


Chapter Five. Sometimes your companion is off on useful business; crafting, gathering or conducting important missions.    Deployed.

The timer on the panel indicates when she'll be back. 


Chapter Six. You can also send your current companion off to vendor all the grey items in your inventory.

This is useful out in the back boondocks when you can't find a vendor.  And your inventory bags are full.

Afterall, you need every last credit you can get so you can pay your crew and buy speeder training.

Chapter Seven.  Sometimes your companion dies for the cause.  And sometimes she holds the mobs and takes one for the cause while I run like a little girl.

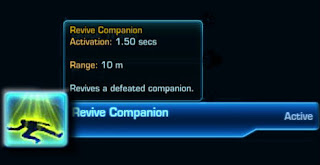
If I am within 10 m of my companion's corpse, I can rez her with Revive Companion.  Or, clicking her corpse.

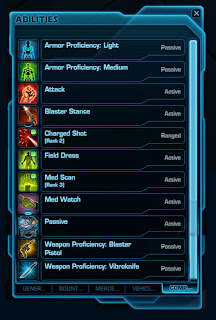
From the top menu bar, Abilities, General, Revive Companion.   It appears you can Revive Companion in combat.

If you are out of range, you can Summon Companion.


 Chapter Eight.  It's usually a good idea for a crew to have some affection for their Chief.  The more your companion likes you, the faster they preform crew tasks - and the more successfully.

As the affection of a crew member increases, new conversations, quests and story lines open.  Affection can be gained and lost during conversations as you chose answers.  Answers that your companion agrees with will gain you affection.  You can improve affection by giving your companion gifts.

Try to choose gifts your companion will actually like!  You can learn more about your companions' personality by reading Mission Log, Codex, Persons of Note.


Chapter Nine.  Along the way, you will be improving your Presence stat.  Whereas Affection indicates how a particular crew member views you, Presence is a base stat you have that increases the combat effectiveness of your current companion.

As you level up, your Presence stat will improve along with all your other stats.  Presence can also be increased with:  BioChem, Mods, and probably gear.


Chapter Ten.
  Just as you spend time understanding your own abilities, you are also expected to be extremely familiar with your crew abilities.  As you level up, your crew will also level and gain new and improved abilities.  Abilities differ amongst crew.  A crew member can specialize as healer, DPS or tank.

Some of the abilities are a stance, much like hunter and warlock pets in WoW.  Passive or Defensive.  Or Healing.  Other abilities are on use abilities.

Study them.  Know them.  Love them.

Embrace your inner Crew Chief.

On use abilities can be on 'auto' - AI controlled or 'off' - player controlled.  Right click the ability to toggle it auto or off.
The green box in the upper right corner indicates ON auto.
The stance, or mode is indicated by the blue rectangular ON along the lower edge of the action.


And lastly, Chapter Eleven.  You might not have to feed and train your crew, but you do have to equip them.  Find their gear at Character, Companion.  

Oh, and their gear does take durability loss as you engage in battle and take damage.  Just as your gear does.  Don't forget to Repair Gear!

Your companion has almost the same gear slots as you.  They do not use Relics, but they do have a Companion Customization slot.


Take a close look at the gear and stats your crew member has when they join your staff of merry maunders.  This will give you a good idea of the armor type and stats you should look for on upgrades.

Oh, and it is not cool to roll "Need" on gear for your companion.  And we are the kool-kids so we only roll greed, and only on gear appropriate for our companion.  Hunters don't need Strength.  Just sayin'.

Comparitive tooltips for you and your companion gear can be enabled in Game Menu, Preferences, User Interface, Tooltip.  Enable Comparative Tooltips and Enable Companion Comparative Tooltips.

And thus concludes our first Chapter Book, Crew Chief 101.  The next Crew Chief Course will start with Chapter Twelve and discuss the beginning companions and their various stats and functions.


Monday, December 19, 2011

Have Spaceship will Travel


The universe opens when you complete your class quest line on your second planet [Drummand Kaas on Empire], generally around level 15.  Wowzers, look at that Milky Way we get to go exploring.  Oh the places we will go!

My very own ship.  Poorly equipped, but she's mine.

Isn't she beautiful?  Go ahead, you can admire her.  I know you want to.  You can look over your ship details in your character tab.  Click Character in the top menu bar, then elect the SHIP tab at along the bottom.

I'm going to venture a guess that I will be filling up those equipment slots as soon as I start some space combat.

Oh, and rumor has space combat is another good source of funds.

You train and quest for your space ship.  There is no out of pocket credits required for the skill or the ship.  Well, this ship.


Here is my ship sitting in the launching bay.  She is sure beautiful.  I think I'll name her George.

George the Ship is equipped with:
  • droid - your second crew member
  • cargo hold
  • galaxy travel map
  • holoterminal
  • Fleet Command communicator
I will be thrilled beyond measure when the ship is equipped with a mail pod.  Hello Bioware?  Mail - from ship.  Totally doable.

Super Secret Agent Pro Tip:  You earn rest bonus on your ship.

Getting to your ship requires you to travel to the space port, then find your class launch bay.  You travel with just your crew.  Enter the launch bay and make your way down the halls to your ship.  Revel in her beauty.  Up the loading ramp and into your ship.

Space Travel


Make your way to the cockpit of your ship.  Sit yourself down in the chair or click on on the galaxy map.  The galaxy map is the holographic looking fan.


Hubs and I are in a party and we are both on Balmorra traveling to Drummond Kaas.  Find the galaxy (Seat of the Empire) with the planet to which you want to travel.  Click it.


The galaxy opens up and displays the planets you can travel to.  As you mouse hover over each planet an information bubble displays the planet level, alliance and the quests you have.  Click the planet you want, pay your space port fees, and travel the universe!


Sunday, December 18, 2011

Skills to Pay the Bills

What would a MMORPG be without skills and crafting?  Heck, I really like virtual fishing.  No slime!

swtor has adopted a bit of different strategy with crew skills and crafting.  It's a bit unusual, but once you get going, kinda fun.  Costly, but fun.  I'm having to slow down some because I'm not yet able to sell much on the auction and skilling up and gathering mission mats is just getting too expensive. 

In the mean time, the quick way to in-game credits?  Slicing so I hear.


When you leave your starting planet and head to Fleet Central you can visit all the trainers and learn about the crafting, gathering and mission skills.  Each trainer you visit grants you XP and gives you a CODEX entry that describes the skill.  You should visit ALL the trainers then read up in the CODEX and confirm which you want to learn. 

Get to your Crew Skills information by clicking your Mission Log icon in the top bar.  Then click the CODEX tab [at the bottom of the window], then click Crew Skills.  Crafting is making something, and swtor allows you to learn only one crafting skill per character.  Gathering is collecting items from the world or sending your companions on missions to collect items.  Mission skills reward items from the mission the companion completes successfully.


Super Secret Agent Tips!
  • your crew can craft using items stored in your bank vault
  • your companion can be off on a mission while you are traveling
  • some crafting recipes require white items that are purchased from the Crew Skill Trade Vendor - stock these up in your bank vault
  • missions have a difficulty level - hard missions can fail and easy missions reward no skill increase
  • you and your companion can both gather items in the wild
  • collecting items in the wild requires a minimum gather skill level
  • your crew can go on missions to improve your gathering skill
  • your crew can queue up to 5 crafting items at a time, per crew member
  • your skills belong to you but any of your companions help you perform the skill
  • multiple crew members can simultaneously be dispatched on crew assignments
  • your crew is very well paid and you can not afford a speeder
  • a really good Crew Skills Guide


Open the Crew Window by clicking this icon on your companion frame or Crew Window in the top menu bar.


Crew Skills & Management

Take some time on with this window.  There is a lot of options and information here.  

This is Sonoma at level 16.  She trained Biochem, Bioanalysis and Diplomacy.  Her Biochem level is 57 of 400.  Her bioanalysis level is 88 of 400.  Wild gathering FTW! 

Sonoma presently has two crew members, Kaliyo and 2V-R8.  Kaliyo is her current companion.  Kaliyo likes Sonoma slightly more than 2V-R8 likes Sonoma. 

The more a crew member likes you the faster they work for you.  Perhaps they would also give discounts?

Both crew are on Biochem crafting missions, and you can see the time remaining, per crafting item.

As you level up more crew can be assigned missions simultaneously.

If you companion is away on a mission, the companion frame changes.  The companion is not available but will return in 16 minutes.  And 01 seconds.  Because a second can be a long time.


This is a crafting window.  Listed are all the schematics (recipes) known to you.  Schematics are learned from the trainer, and from Schematic drops.  Slicing is a gathering skill that frequently finds schematics, which means schematics will be listed at auction.

The summary pane on the left shows how many you can currently make of each schematic; if they grant skill points and the difficulty.  Selecting an individual schematic will list required ingredients.  Pro tip!  Your crew can use ingredients that are in your bank.

In the lower right corner, Kaliyo is the current companion, and by default if you click CRAFT now, she will go off for awhile and send back her results. 


However, notice the handy drop down indicator?  You can pick which ever crew member you like.  It does not have to be your current companion.  You can have your crew working for you while you are out questing.


Take note that the Diplomacy Missions award Light or Dark Alignment points.

Look closely  at your crew in the task assignment window.

Each companion can have different skills buffs.


See Eeet?  This might be important if your crew is failing missions.  Missions can fail; you spent your credits, got no goods - but you did get a skill point.


As you start collecting items you crafted, stock some up for reverse engineering.

Reverse engineering will return you some of the materials needed to craft that item, as well as offer a chance to make a better version of that item.

A much better version.  Just sayin'.
  You can only reverse engineer items that you can craft.  To RE (reverse engineer), left mouse click the reverse engineering tool at the top right of your inventory window.


You now have a RE wrench, you can tell because the Reverse Engineering label is gold.

As you mouse hover over an item in your inventory that can be RE'd, your mouse will turn into a wrench shape.  To reverse engineer that entire stack click the right mouse button.

Super Secret Agent Tip!  If you intend to KEEP a few of those crafted health pots to keep yourself alive, make sure to split the stack first.  Split a stack by shift-left-click drag.


Gathering in the Wild.


As you are off gallivanting around the universe, gathering wild ingredients will save you a lot of money and skill you up to boot.  Your companion will do most of your gathering (and you don't even have to pay them!).  In the screen shot above, my companion Kaliyo is bioanalysing the Yozusk Bonebreaker carcass.

I'm lolly-gagging around, but I could be gathering from something else, or heading on down the road.  Provided Kaliyo is not interrupted, she will complete her gathering and catch up to me.


The mini-map is set to display all the gathering nodes in the area.  They show on the map as daisy looking symbols.  Like this.

If you are so inclined to be crazy, you can turn off the daisy.  Just click the mini-map filters over on the upper right of the mini-map.

A few last things about gathering in the wild.  Carcass that can be gathered are pretty easy to see.  Just mouse over a carcass and the mouse pointer will change.

Items that spawn in the wild are a rip-roaring pain in the arse to find.  You would think with the difficulty finding the darn things they would reward superior loot.  Items in the wild DO NOT HAVE BLINKIES!  The nerve.

You can mouse over a node marker on the mini-map and the mouse pointer information frame will give you more information.  Here we see, it is a Bioanalysis gathering node.  Scan your mouse around the area until you are lucky enough to see your mouse pointer change to the gathering pointer.  Huzzah!  Secret Agent Tip!  If the node is out of range for you, your ever so helpful well paid crew member companion will trot on over and do the harvesting while you mosey on down the road.  Unless she aggro's something and gets attacked.  Which if your are an agent you could go into stealth mode to lessen that chance.  Just sayin'.

Misc. It's Nice to Know - crafting mats stack to 99 - Biochem consumables stack


***************************************


Oh, and if you are out on a long assignment and your bags fill up with grey items, you can send your companion off to vendor them for you.   


Rightfully so, as much as I pay her!


And this concludes Crew Skills 101.